
Poll Maker - Help
Walk Through
Take the Walk ThroughCreating your Poll
Adding your Question Adding Answers Adding Pictures Adding Multimedia Preview your PollPoll Themes
Selecting a Theme Customize your Theme Adding a Background Color or Picture Saving your ThemePoll Settings - Basic
Changing Poll Settings Show / Hide the Comments Section Blocking people from responding Selecting multiple answers Adding custom 'other' answers Hiding poll results Hiding the results buttonPoll Settings - Advanced
Setting a Start and End date Track / Do Not Track Voter Location Changing the button text Asking for a Name or Email Display answers in multiple columns Randomize answer order Add instructions to your poll Import votes from an existing pollSharing / Publishing Poll
Sharing via a Link Sharing via Facebook / Twitter Sharing your Public Results Embed your Poll in a website Email your Poll Secure your poll with Unique CodesYour Account
Signing Up for an Account Accessing your Account Forgot your Password Claiming a Poll or Quiz Login from the Share Tab Updating your Account Details Changing your PasswordManaging your Polls
Viewing your Active Polls Viewing your Stopped Polls Searching for a Poll Editing an existing Poll Publishing an existing Poll Viewing your Results Viewing individual Voters Printing individual Voters Adding Votes to your Poll Securing your Poll Exporting Results to Excel/CSV/HTML Stopping your Poll Clearing your Poll of Votes Deleting your Poll Deleting Individual VotesReporting
Printing reports to PDF / Paper Viewing the response Timeline Viewing the response Map Viewing the vote Pie Chart Viewing your CommentsAdding Your Question
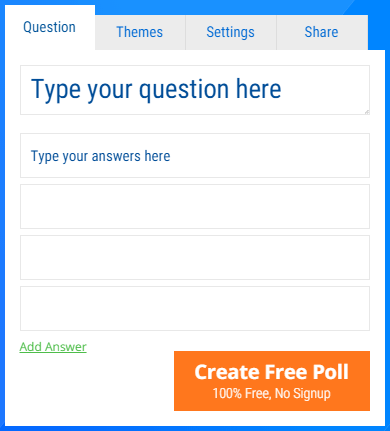
Click into the box with the text 'Type your question here' and it will become blank. Type your question into this box and you will see it appear as you type in the Poll Preview on the far right.
You will also see a blue image button appear to the right of the box. Click this to Add Pictures, or to use the Advanced Editor to add links, videos, html, multimedia or other any other custom content.
Adding Answers
Type your answers in the boxes provided under the question box, starting with the box that contains the text 'Type your answers here'. When you click inside the box the text will disappear and you can type.
As you type your answers you will see them appear in the preview on the right.
Reorder Answers
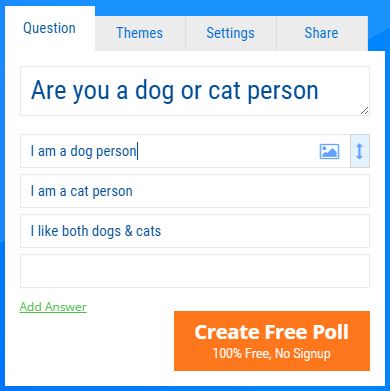
- Click inside the answer box to select the answer you wish to move.
- You will see an up down arrow appear to the far right of the box.
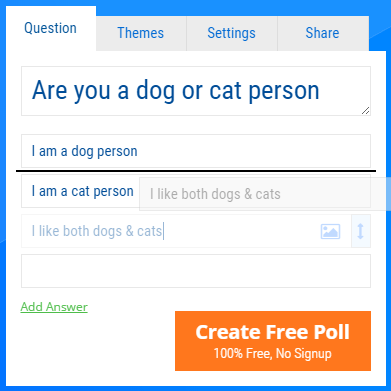
- Click on and then drag the arrow to move this answer. As you drag you will see a black line appear above or below the other answers, showing where the answer will be moved to when you release the mouse.
Delete an Answer
To delete an answer just delete all the text for the answer. You can either add a different answer in that box or just leave it blank and it won't be included in your poll.
If you have added a picture and need to remove it, click the 'picture' button and then click 'delete' in the new window that opens and then click 'OK'
Adding Pictures
To the right of the question text box and every answer box is the 'Add Picture' icon - click it to open the add picture dialog.
Add from your Computer / Camera
Click the 'Upload' camera button to upload a photo from your Computer/Mobile or to take a photo from your mobile. Select the photo you want and then click ok.
Add from a website
Paste the URL of the picture you want into the white text box and click the 'Add' button to copy a picture from a URL.
Crop your picture
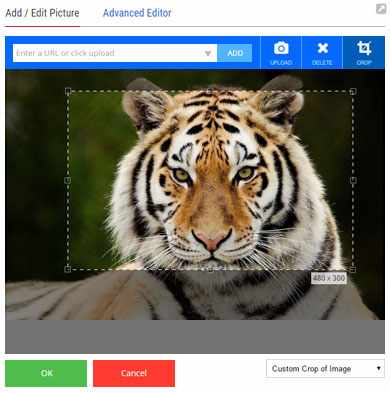
A crop box will appear when you add a picture so that your picture will be in the right dimensions for your poll. Use the drag boxes in the corner to resize the crop section or click and drag to move it around. Only the area inside the dashed crop area will appear in your final picture.
Remove the picture crop
If you need to see the full picture you can remove the crop altogether by clicking the 'Crop' button in the top right - this will remove the crop window and show the full picture in your poll.
Delete your picture
Click the 'Delete' button at the top of the window to remove your picture from your poll - this will not delete any pictures off your computer or mobile.
Adding Multimedia / Links
Click the 'Add Picture' icon to the left of the question text box or any answer box, then in the dialog that appears click 'Advanced Editor' at the top of the window. The question or any answers that have advanced content will appear blue in the editor and you can click them to edit them again.
Add Videos or Custom Pictures
Click 'Insert' in the toolbar and then select 'Insert Video' or 'Insert Image'. Then add your video or image details in the dialog and click 'ok', and then 'ok' again on the 'Advanced Editor'
Add a Link
Click 'Insert' in the toolbar and then select 'Insert Link'. Enter your link details and then click 'ok'
Advanced Features / HTML
You can also use this dialog to add tables, text formatting & colors and from the 'Tools' menu you can select 'Source Code' to add HTML directly.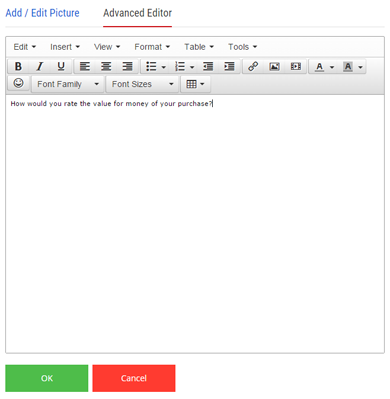
Preview your Poll
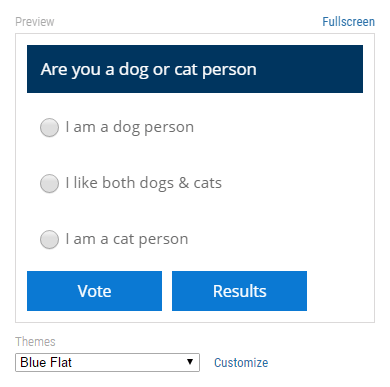
To the right (or underneath on a mobile) is a box with a live preview of your poll, it will change automatically as you modify your poll.
You can change the active theme from the drop down list below the preview and it will update immediately. Click the 'customize' link to customize the look of the theme to your exact needs.
Preview your Results
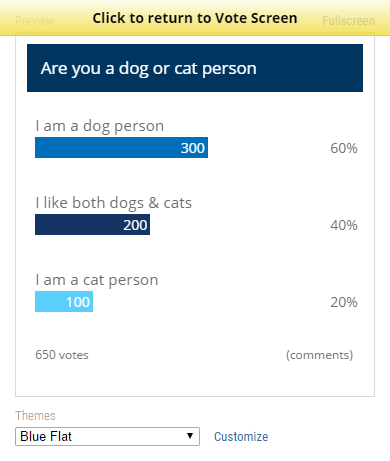
You can also preview how your embedded results will look by clicking the 'Vote' or 'Results' button in the preview box. This will load the results as they would look to your visitors (but with fake vote numbers). A yellow bar will appear at the top of the results box and you can click this to return to the default preview of your poll.
Full Screen Preview
In the top right is a 'Fullscreen' link that will open up your poll in a new window - you will need to save your poll first.
Selecting a Theme
Use the second 'Themes' tab to change the look of your Poll, you can select from a large range of different themes, or start with one of ours and customize it to suit your website.
Default Themes
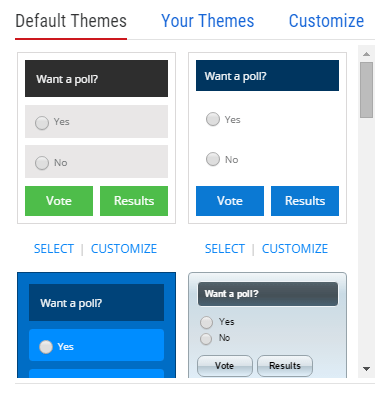
This is where you will find all our themes, scroll down to see them all and select the one you like by clicking on it (you will see the preview change on the right). Some of the themes have background images - you can select a Theme with a background image and then click Customize to go to the Customize section and change the background image.
Your Themes
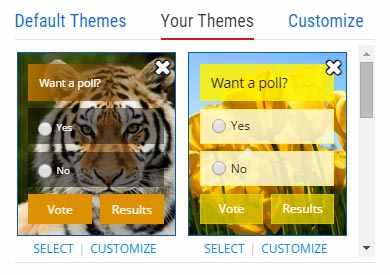
If you have customized a theme and saved it then it will appear in this section, you can select themes here by clicking on them - you can also go to the Customize section to change them further.
Customize your Theme
Once you have selected a theme from the 'Default Themes' or 'Your Themes' you can click 'Customize' up the top to make any changes you like to that theme.
How to Customize
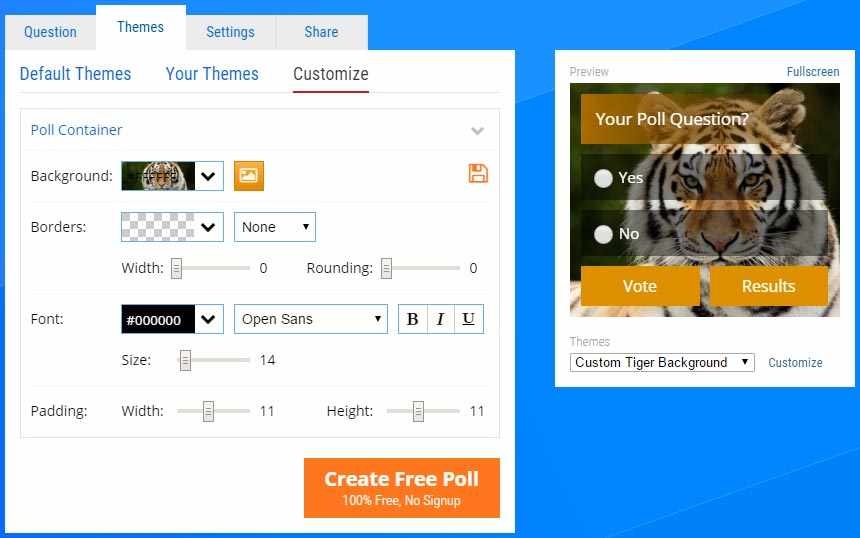
The customizer is split up into different sections for each part of the poll, you can change between sections (see below) and then modify every aspect of those sections including Background Colour, Picture & Gradients, Borders, Fonts, Font Styles and Padding/Margins.
Customize each Section
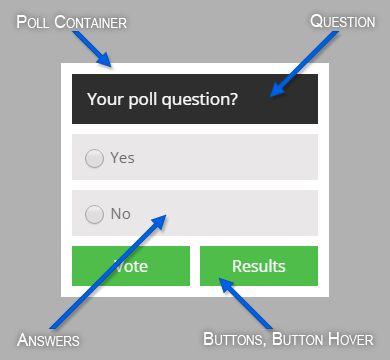
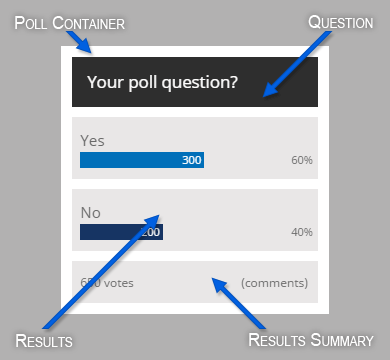
At the top of the customize section is a blue title that indicates the part of the theme you are currently working on. Click on it to change the section, or hover over the preview and click to directly select the section under the mouse pointer.
- Poll Container: The box that wraps around the entire poll
- Question: The text of the question itself and it's background
- Answers: Each of the individual answers and their background
- Buttons: The 'Vote' and 'Results' buttons at the bottom of the page
- Button Hover: Styles for when you hover over the 'Vote' and 'Results' buttons
- Results: These are the colors and styles of the bar charts - the preview will change when you select this section
- Text Field: For text based answers these are the styles for the Text box/area
- Background: This is the background and styles for the entire page - use it to add a background picture
- Answer Selected: The style when an individual answer has been selected
- Answer Hover: The style when you hover your mouse over an individual answer
Adding a background color or picture
Use the Customize section of the Poll Maker to add a background color, gradient and/or image to your Poll. If you wish to add a different picture to each question it is better to add the picture directly to the question on the 'Poll' tab.
Adding your Backgound
- Go to the 'Themes' tab of the Poll Maker
- Select a Theme from the 'Default Themes' or 'Your Themes' and then click Customize at the top
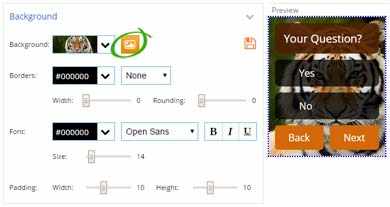
- Click on the blue text at the top and change it from 'Question Container' to 'Background' if it isn't already on 'Background' - if you don't want the picture to span the whole page and just be behind the question you could instead add your background to the 'Poll Container'.
- Next to line that says 'Background' is a box with a drop down arrow and a button with a picture on it.
- Click the arrow to add a single color and in the box that drops down select the saturation on the left and the hue on the right then click the arrow again to hide the box. You should see the color change live in the preview
Please Note: If the 'Question Container' has a background color as well then you might only see a bit of the background color because it will be hidden by the 'Question Container', see the next section on how to remove the background from the 'Question Container' if you need to. - To add a Background Picture click the button to the right of the arrow with the photo icon
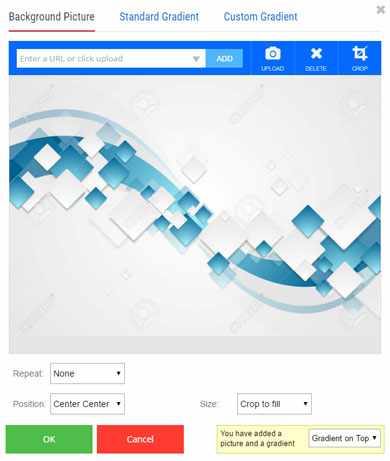
- In the window that opens click the 'Upload' button to add a photo from your computer or type a URL and click 'Add' to add from the web. See the Add Pictures section for more instructions.
- Underneath the Photo preview are some options for the display of the background, they are further explained below.
- You can optionally add your own gradient to go over the top or underneath the picture (explained below).
Background Picture Options
There are 3 options that can change how your background appears
- Repeat: If your background doesn't fill the entire area this sets if the image will repeat or just stop. ('Both' Recommended)
- Position: This sets where your background will sit on the page, eg: Left Top will start the background at the very top left corner of the page ('Center Center' Recommended)
- Size: This will set how big your background is on the page, 'Crop to fill' is best because it will make the picture fill up the entire page and only crop any bits that don't fit on the page ('Crop to fill' Recommended)
Adding a Gradient
- click the Background Picture button to the right of the arrow with the photo icon
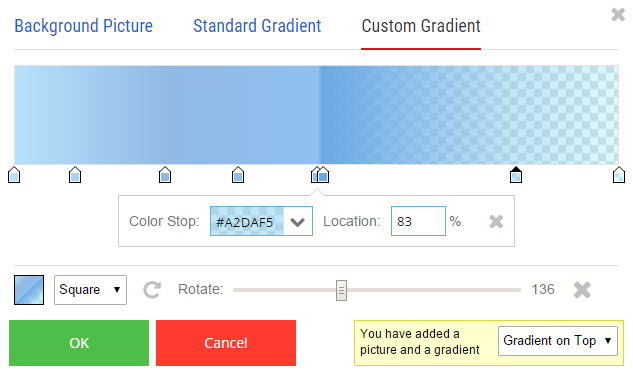
- At the top of the window select 'Standard Gradient' for a default one, or 'Custom Gradient' to make your own
- for a 'Custom Gradient' click on the small colored arrows underneath the gradient preview then change their color directly below next to 'Color Stop:'
- You can drag the arrows to move their position and it will change where that color starts. Click anywhere in the zone directly below the gradient preview to add a new 'color stop' at that position. The mouse pointer will show a as you hover.
Removing the 'Poll Container' Background
If your 'Poll Container' has a background and you wish to remove it you can do it so that the poll is transparent and shows your website background.
- Click on the blue text at the top and select 'Poll Container' from the list
- If the picture button is orange, click it and then click the delete cross to remove the photo and click 'OK'
- Click the drop down arrow across from background and slide the slider next to the 'a' (Alpha Transparency) down to zero to set it to transparent
- Alternatively just delete the text from the box and type 'Enter'
Saving your Theme
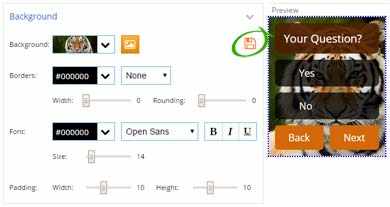
You can save your custom theme into the 'Your Themes' tab for use in other Polls. From the Customize section change the Theme to how you want it and then click the save icon and give your theme a name and click 'Save' to save your custom theme. The save icon will be orange if you have made changes that you haven't saved.
Deleting one of your Themes
If you no longer need a theme you can delete it from the 'Your Themes' tab by clicking the cross icon in the top right of the theme.
Changing Poll Settings
The 'Settings' tab allows you to change exactly how your poll and results are displayed and behave, it is split into Basic and Advanced settings.
Poll Settings - Basic
- Show / Hide the Comments Section
- Blocking people from responding
- Selecting multiple answers
- Adding custom 'other' answers
- Hiding poll results
- Hiding the results button
Poll Settings - Advanced
Blocking people from responding
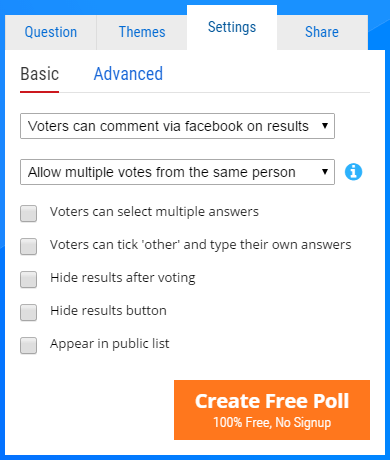
If you need to ensure people only respond a set amount of times you can using the second drop list on the 'Basic' section of the Settings tab. By default people are allowed to answer a poll as many times as they like.
Please Note: You can change these settings after a poll already has votes and it will apply it to previous votes as well - no votes are ever deleted based on changing this setting so you can freely change it and then change it back.
Allow multiple votes per person
All votes are reported on regardless of if the person has answered previously or not.
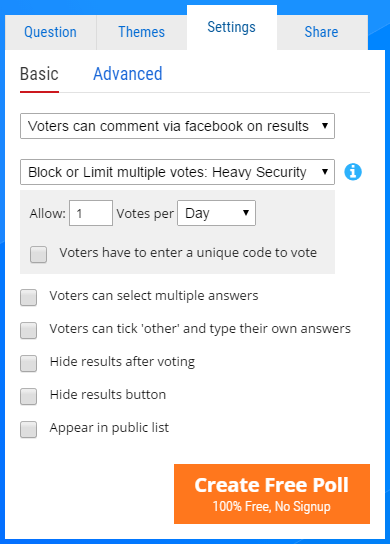
Block or Limit multiple votes
If a person votes multiple times their extra votes will be filtered from the reports and data exports.
- Light Security: The minimum amount of votes are blocked and there is no chance that a valid vote will be blocked
- Heavy Security: The vast majority of invalid votes are blocked and there is a (very low) chance that a tiny amount of valid votes will be blocked
- by IP Address: Votes are blocked based on the voters IP Address - it is not recommended to use this setting unless you understand what an IP Address is and how multiple users can possibly have the same one.
Allow multiple votes per Hour/Day etc...
After you select 'Block or Limit' multiple votes a box will appear underneath allowing you to set how many votes you want and by what time period (eg: Allow 5 votes per day).
How does it work?
We use very sophisticated tools to determine the likelihood of two votes originating from the same person, including Encrypted Validation, Fingerprinting, VPN & Proxy detection, DNS Leak detection, IP Matching, Timed Pattern Matching, and Heuristic algorithms.
Can I remove votes
If you want to also remove votes manually you can from the Manage Voters section in your Account.
Selecting multiple answers
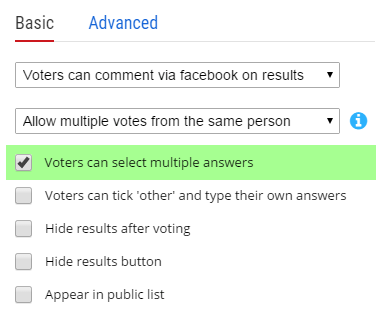
Click 'Voters can select multiple answers' to enable your voters to tick more than one answer before clicking 'Vote'.
Multiple Answers versus Multiple Votes
- 'Multiple answers' allows a voter to select more than 1 answer within a single vote
- 'Multiple votes' allows or blocks a voter from entering a vote (and then clicking the 'Vote' button) multiple times. It can be updated from the Security drop down.
If you have also used the Security drop down to block multiple votes from the same person, then your voters will still be able to tick multiple answers before clicking 'Vote' and all their votes will still count. However if they come back to vote again it will not be counted (depending on how many votes you have allowed).
Adding custom 'other' answers
If you think there might be more answers to your poll than you have added in the Answers section then you can tick 'Voters can tick other and type their own answers'.
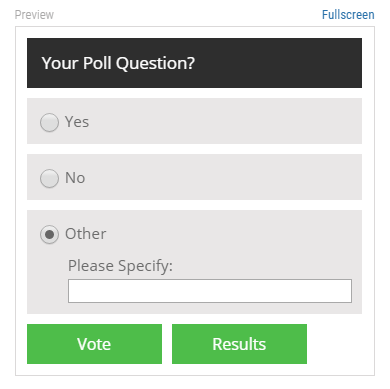
This will add one more answer to the end of your poll with the text 'Other'. If the voter ticks this then it will show a box immediately underneath that says 'Please Specify' and allow them to type in their own answer.
Reporting on 'other' answers
The responses people add to the 'other' answers will appear in your reports under the total amount of votes for the 'other' section. They will be grouped together based on a non case sensitive match of the text (eg: 'No' and 'no' will be grouped together).
Deleting or Changing 'other' answers
If you have created an Account then you can delete and change 'other' answers from your Account Dashboard. If you haven't created an account you can still do so and then Claim your Poll from the dashboard.
- From your Account Dashboard click on your poll
- In the box that opens underneath your poll question, click the blue link 'Click to Manage' that appears in your results next to the 'Other' answer. You may need to click a blue 'More...' link to see the 'Other' answer.
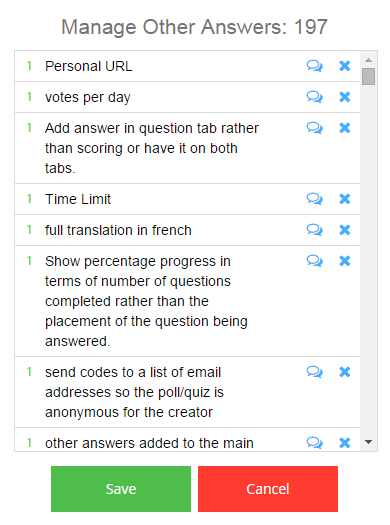
- A new window will open with all your voters 'Other' answers in it - if you scroll to the bottom of the window more answers will load automatically.
- to Change an answer click the comment icon to the right of the answer and then modify the answer and click 'OK'.
- to Delete an answer click the delete icon to the right of the answer.
Hiding poll results
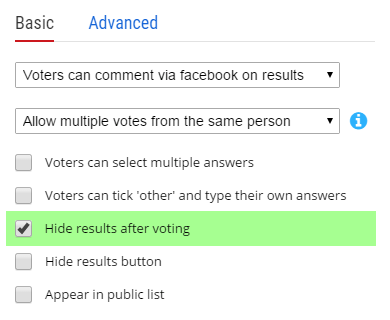
You can hide the poll results from your voters if you want to keep them to yourself. Tick 'Hide results after voting' from the 'Basic' section of the Settings tab.
This will also remove the 'Results' button from your poll as the button is no longer necessary once the results are hidden. When this option is ticked your voters will not see the results at all (even after voting).
If you have already embedded your poll before setting this option then it is a good idea to save and then get the code again from the Embed section of the Share tab and repaste it into your website.
Hiding the results button
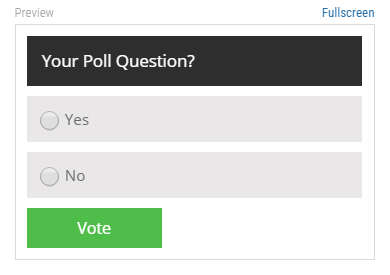
If you want to hide the 'Results' button in your poll, but still want your voters to see the results after voting then you can use this option instead of the Hide Results option.
Tick 'Hide results button' on the 'Basic' section of the Settings tab and the 'Results' button will be removed from your poll.
If you have already embedded your poll before setting this option then it is a good idea to save and then get the code again from the Embed section of the Share tab and repaste it into your website.
Setting a Start / End date
If you set a start and end date for your poll it will mean that people will only be able to respond to your poll during the set time frame - outside those dates/times they will be presented with a message either saying the poll hasn't started yet or has already ended. You can set either the start or end date or both and it will still work.
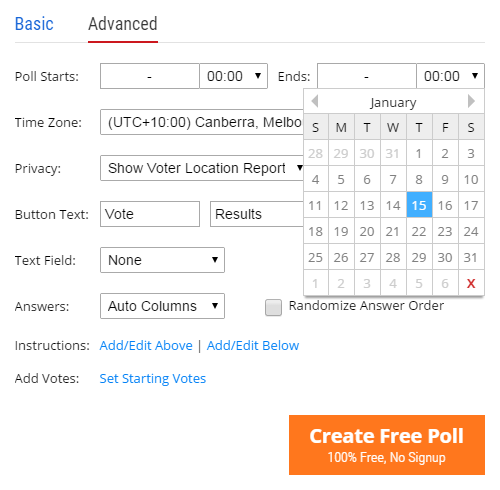
Set the dates from the 'Advanced' section of the Settings tab by clicking in the box to the right of 'Poll Starts:' or 'Ends:'. A drop down will appear with a calendar of dates
Using the Calendar
- Click the left and right arrows next to the month to change the month
- To change the year keep clicking the arrows to before January or after December
- Click the date that you want when you have found it
- Click the red X in the bottom right to remove the date completely
Start and End Time
Next to the date box is a drop down list to set the time. It is in 24 hour time so 00:00 represents 12:00 AM in the morning, and 23:30 represents 11:30 PM at night. You can only set the time in half hour increments.
Setting the Timezone
By default the Timezone should be set to your current one, however if it is not or if you need a different timezone you can change it using the drop down list directly below the start and end date boxes. The timezone set here will be applied to the start and end dates and will be the one used in all your reports and exported data.
Track or Do Not Track Voter Location
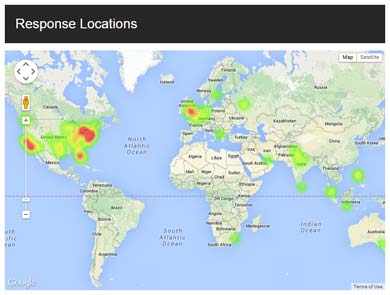
In the public results that appear after you finish the poll, you can Show or Hide a Location Heat Map of all votes from the 'Advanced' section of the Settings tab - change the 'Privacy' drop down to 'Show Voter Location Report'. If you choose to hide the reports you can still access them from your Account Results by creating an Account.
Not Tracking Voter Location
If you do not wish to track your voters locations for privacy reasons you can set the 'Privacy' drop down to 'Do not track Voter Location'. This will stop all tracking of the voter location and remove the map from your public results. The map will still appear in your Account Results but will not show any data because none is tracked.
Location Heat Map
The map shows the intensity of votes from each region of the world. Red indicates a large amount of votes, yellow indicates a moderate amount of votes and green indicates few votes. You can zoom in and out of the map with the vertical drag bar on the left of the map, and you can click and drag to move around the map.
Changing the button text
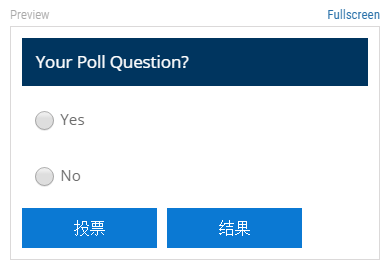
You can change the text of the 'Vote' and 'Results' button from the 'Advanced' section of the Settings tab. This is useful for example to translate them into another language, or just to use your own wording.
To use your own button text, replace the text 'Vote' and 'Results' in the boxes next to 'Button Text'.
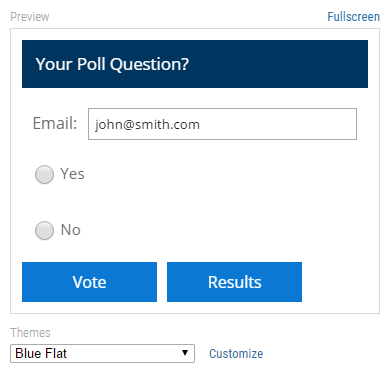
Asking for a name or email
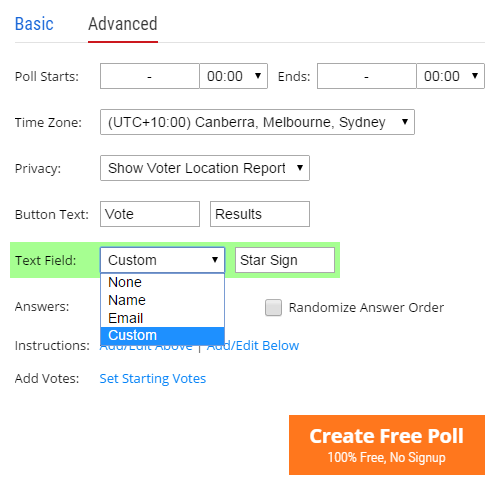
If you wish to ask your respondents for their Name or Email address you can do so. Change the drop down marked 'Text Field' from the 'Advanced' section of the Settings tab.
You will see the text field appear in your poll preview with the 'Name' or 'Email' label or a 'Custom' label of your choosing.
Asking for a custom value
If you select 'Custom' from the 'Text Field' drop down list a new field will appear where you can type your own custom label and ask your voters to enter any text (or numerical) value.
Getting the 'Emails' or 'Names' Entered
You can view/download the emails or names entered from your Account Dashboard. Click on your poll from the list and then click Export to export your results to Excel, HTML or CSV. The exported results will contain the Emails/Names that were entered.
If you wish to just view the results then select 'HTML' from the File Type options and then click the downloaded file to view it in your web browser.
Display answers in multiple columns
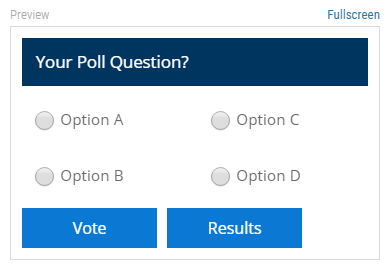
If you wish to display your answers side by side or in columns you can do so from the 'Advanced' section of the Settings tab. The default setting is 'Auto Columns' which will automatically determine how many columns are needed based on the size of your answers, the presence of pictures and the width of your poll.
To manually set the number of columns change the 'Answers' drop down list from 'Auto Columns' to how many columns you need (up to 4).
Randomize Answer Order
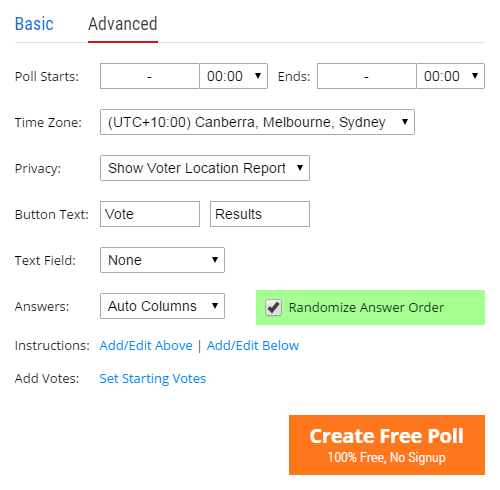
To improve the accuracy of your results, or just to make a poll more interesting you can make the answers appear in a random order every time the poll is loaded. Tick 'Randomize Answer Order' from the 'Advanced' section of the Settings tab
Add instructions to your poll
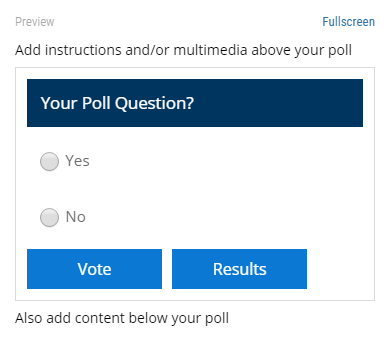
You can add instructions to the start and/or end of your poll from the 'Advanced' section of the Settings tab. Your instructions can be plain text or can include, links, pictures, sound, video or any valid HTML.
Next to the text 'Instructions' click 'Add/Edit Above' to add instructions to the top of the page above your poll. Click 'Add/Edit Below' to add instructions underneath your poll on the page. These instructions will be included in your embed code if you embed the poll, or on your poll page if you link to your poll.
Adding Advanced Content
You can use the buttons on the toolbar or the 'Insert' menu in the Advanced Editor to add links, pictures or video etc... If you are proficient in HTML you can click the 'Tools > Source Code' menu to directly edit the HTML of your instructions.
Import votes from an existing poll
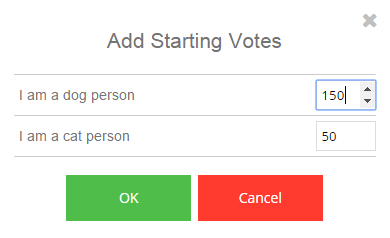
To import votes from an existing poll click 'Add Start Votes' from the bottom of the 'Advanced' section of the Settings tab.
A new window will open up and you can set a starting vote value for each answer which will always be added to the total votes even if you clear the poll. You can remove or change the starting vote numbers from this same window.
These added votes will also never be filtered or removed by your Poll Security settings.
Sharing via a Link
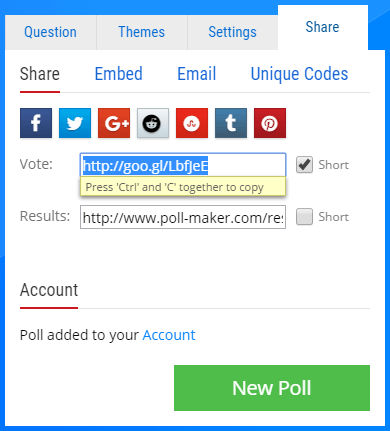
You can share your Poll via a link (URL) which can be emailed or posted to a website, Facebook, Twitter etc... These links are permanent and will not be removed unless you decide to delete your poll or unless the poll is found to be in breach of our Terms.
Once you have created your poll, use the orange 'Create Free Poll' button at the bottom to save it and you will be taken to the 'Share' tab. Click in the box next to 'Vote' and copy the link.
Short Links
For your convenience links are automatically shortened using Googles link shortening service. This provides you with a much shorter link to remember or share - however if you wish to use the original link just untick the 'Short Link' tick box next to the link and it will be changed back into the original link hosted at www.poll-maker.com
Sharing via Facebook / Twitter
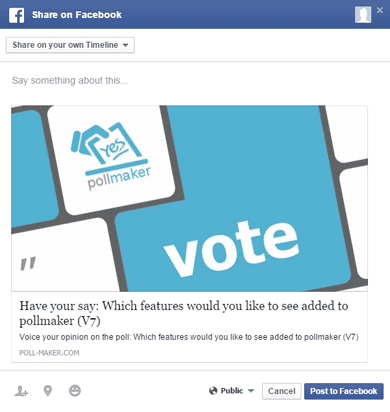
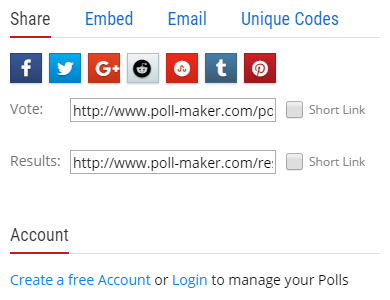
From the 'Share' section of the Share tab, after you have saved your Poll you can also share it to Facebook, Twitter, Google+, Reddit, Stumble Upon, Tumblr and pInterest.
If you don't recognize the icon for the service you wish to share to you can hover over the buttons to see the full name. Clicking the buttons will bring up a dialog that will enable you to post to that service. Make sure that the dialog is not blocked by a popup blocker if you have one (usually it will say in the URL bar of your browser if a popup is blocked).
Sharing your Public Results
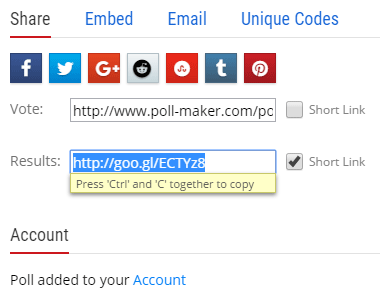
On the 'Share' section of the Share tab, after you have saved your Poll, you will also find a link to your public results next to the label 'Results:'. Click in the box and copy the link, you can also use a Short Link as per the Poll Link.
This link will give you the results that your poll taker will see at the end, minus any specific Score, Grade or Outcome they personally would receive.
It is mostly useful for 'Poll / Vote' and 'Survey / Other' Poll Types, or to link just to the Comment section or Thankyou message.
Please Note: This link is the Public results link, to best see your results it is recommend to Create a Free Account and use the Account Results section where you can see all responses, filter them and download or print your responses.
Embed your Poll in a website
It is possible to embed your poll directly into your own website or blog. To be able to do this your website or blog needs to allow you to post SCRIPT tags to it - if the system you use to host your website or blog strips out or blocks you from posting SCRIPT tags then the embed code will not work.
If posting the code as you usually do doesn't work, many systems have a separate section where you can directly add HTML code, check the reference and help sections of the system you use and look for words like 'Source Code', 'HTML' or 'Advanced'.
Getting your Embed Code
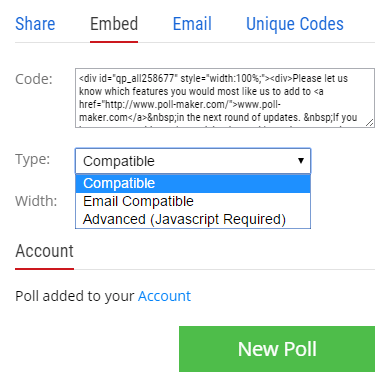
On the 'Share' section of the Share tab, after you have saved your Poll, you will find a blue 'Embed' link at the top of the tab - click it to go to the Embed section. The box labeled 'Code' contains the code you need to post to your website or blog. You can also use the controls under the code box to change how your Poll is embedded as explained below.
Embed Types
Compatible: This is the default option and the most likely to be the best option for you. It will work on almost all websites and blogs by automatically falling back to a compatible version of the code if your website/blog blocks the advanced functionality.
Email Compatible: The email compatible code is perfect for using in any email software that allows the sending of HTML (most of them). If you are unsure how to send HTML in an email check the Help section of your email software. If you use this code the actual poll itself will be embedded in your email and your voters can just click the answer they want to submit their vote (the 'Vote' and 'Results' buttons are not needed). If you want to track who has voted via email you can do so with Email Tracking.
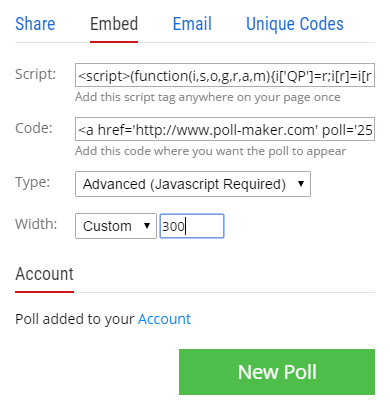
Advanced: The 'advanced' option will give you two sets of code to add to your website. You only need to add the 'SCRIPT' code once on your web page and then can embed the 'Code' section for as many polls as you like. The advantage of the 'Advanced' code is that it will automatically update as you make changes to your poll and you will not need to re-paste the embed code for every change.
How does it work
If a Poll is embedded in your website it will attempt to load our SCRIPT file to manage the poll and allow the voter to stay on your page as they vote and view the results. If the SCRIPT file is not able to load then the poll will fall back to compatibility mode and still allow the voter to post their vote, however this will need to open up a new window to display the results.
Below are some of the main reasons for the SCRIPT file not loading if you are having a problem:
- Your website management software may block the posting of the SCRIPT tag in the embed code. Often you can get around this by checking the Help section of your website management software and there may be a solution there.
- Your visitor may have an extension that blocks Javascript on their browser
- Network difficulty at your visitors end may be preventing the proper loading of the SCRIPT file (we use a 100% Uptime CDN so it is never at our end).
Embed Width
Set the width as a percentage of the section it is embedded in, or choose custom and enter your own width. Auto will choose the width based on the width of the area the poll is embedded in.
Sending your Poll via Email
If you wish to email your poll to voters and/or track which email addresses have voted you can do so directly from the poll creator. You can also use this email system to send automatic reminders and thank you emails, track who has and has not voted and track what people have voted for.
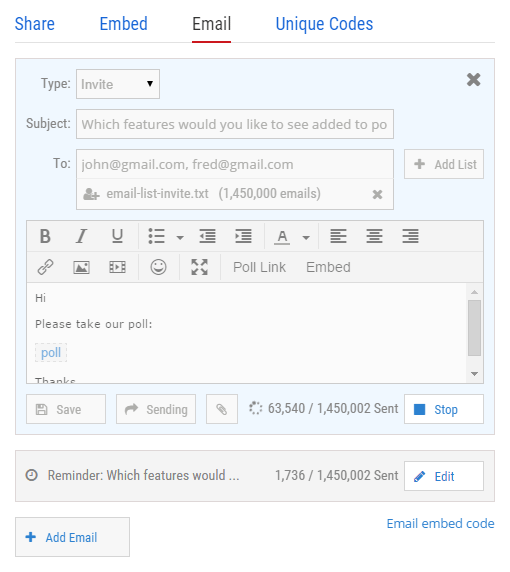
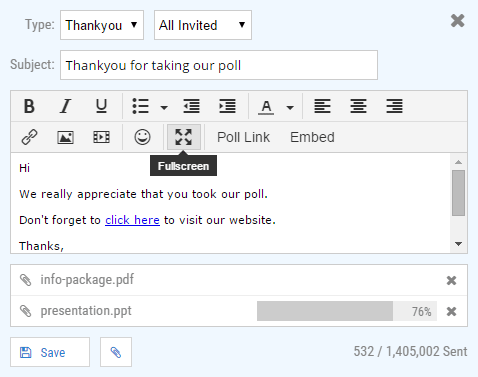
Access the email section by clicking 'Email' at the top of the 'Share' tab. You will initially be presented with 2 automatically created emails (an Invite email and a Reminder email). You can click 'Edit' to modify these or add more emails with the ' Add Email' button.
For each email you add you can choose if it is:
- an Invite to take your poll which you can send immediately, or later at your convenience.
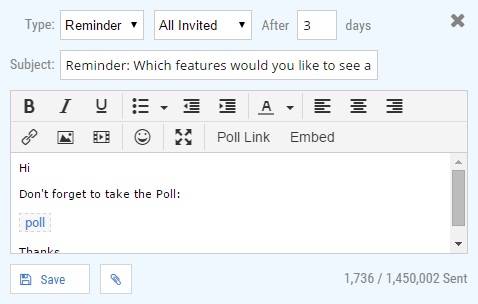
- a Reminder to take the poll which will send automatically to all people who haven't already voted (after an amount of days that you specify).
- a Thankyou email that will send automatically immediately after a voter has voted on your poll.
Sending Emails
There are no limits to how many emails or recipients you can send to. You can click 'Add List' to upload email addresses in a list separated by comma, new line or semicolon. The file must be of the type 'txt' (Plain Text File) or 'csv' (Comma Separated Variable File) - you can export to these file types from almost every Software Package, including Microsoft Excel, Word and Outlook.
If you have over 100,000 recipients for one email, it is recommended that you upload lists of email addresses in files no larger than 100,000 email addresses per file.
Please Note: You will need to verify your email address before sending any emails (you will automatically receive an email with a verification link that you can click). In addition, our system sends out your emails in batches and automatically monitors the response and vote rate of your polls - if your response and vote rate falls below our minimum acceptable level we will review your emails and all abusive or spam emails will get your account permanently banned and your polls removed.
After you click 'Send'
After you have clicked 'send' you can close the browser window and your emails will still be sent - click 'Stop' to stop the sending of your emails. It can take a few minutes to start the sending process due to the verification and monitoring processes (to prevent SPAM) so don't be dismayed if the 'Sent' count does not start to increment immediately.
Sending via your own email service
If you want to use your own email service you easily can by copying and pasting the Email Compatible Embed Code into your email from the Embed section of the 'Share' tab. You can also add tracking codes and track who has voted and download their exact votes or view them live.
Sending Reminder Emails
Click 'Edit' to edit an email and change the 'Type' drop down to 'Reminder'. Some new settings will appear where you can set to send the reminder email to everyone who has been invited (All Invited) or to add your own custom list to send this reminder email to. You can also choose how many days later they receive the reminder. These days are counted per email address from when the original invite email was sent to each individual recipient. This means for example, that if you add a new 'Invite' email and send it to 'John Smith' 2 days after sending your original invite and your 'Reminder' email is set to 2 days later. Then 'John Smith' will recive his 'Reminder' email exactly 48 hours after he receives his invite (which will be 4 days after you sent the original invite).
If you use a 'Custom List' to send the reminder email to, you will still need to make sure those recipients have already been invited via an 'Invite' email as well. However the 'Custom List' functionality allows you to send different reminder emails to different groups of people.
Sending Thank You Emails
Click 'Edit' to edit an email and change the 'Type' drop down to 'Thank You'. You can then choose to send to 'All Invited' or a 'Custom List'
If you use a 'Custom List' to send the thank you email to, you will still need to make sure those recipients have already been invited via an 'Invite' email as well. However the 'Custom List' functionality allows you to send different thank you emails to different groups of people.
Using the email editor
Click 'Edit' to the right of an email to modify it. The email editor will appear with a toolbar that contains basic rich text editing functionality such as Bold, Italics, Underline etc... as well as the ability to add links, pictures and other multimedia.
There is also a full screen button that will expand the editing window to the full browser window size for easier email editing. Click the button again to go back to normal size. You can hover over each button icon to see a description of what it does.
There are two special buttons for adding your poll to the email (it will be added by default anyway, but in case you delete it).
- Poll Link will add the link to your poll into your email at the current point that the cursor is. In the editor the link will appear as a blue box that says 'link' and it can be deleted just like normal text. At the time of sending the system will change the blue 'link' box into a link to your poll that contains tracking codes to track the recipients vote.
- Embed will add a blue box that says 'poll' at the current point that the cursor is. At the time of sending the system will change this blue 'poll' box into an email compatible version of your poll itself that contains tracking codes to track the respondents vote. Your recipients can then just click the option they wish to vote for and their vote will be recorded. The poll is formatted as compatible HTML which works in all current email software and almost all older software too.
Reporting on email voters
To find out what people have voted for you can Download your results to Excel, CSV or HTML. The normal results will contain the email address of your voters.
In the Export dialog you can change the results drop down to Email Report to see a list of all 'Invite' recepients with the following columns:
- Status: If they have received the invite, visited the poll or voted.
- Visited Poll: The date that they first visited the poll.
- Vote Count: How many times they have attempted to vote on your poll (multiple votes will be filtered based on your Security settings).
- First Vote: The date that they first voted on your poll.
You can also see the email addresses of voters in your live individual voters reports.
Using the email text field as well
You can also easily combine emailing your voters with publishing a link and asking voters for their email address. If you add an email question to your poll it will automatically be hidden and recorded when someone votes via an email (so they won't need to enter their email address).
Protect your poll with Unique Codes/Links
You can protect (and track) your poll with special unique codes. You can give these codes to your voters to control how many votes per code and track which codes have been used. Voters will not be able to access your poll without a unique code.
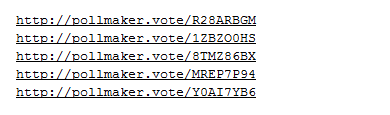
You can also download the codes as short unique links that you can send to voters so that they can access the poll without having to enter the code manually.
Creating your Unique Codes
To setup unique codes, first you need to change your security settings from the 'Advanced' section of the 'Settings' tab.
- Click on the 'Settings' tab and then click 'Advanced' in the top right
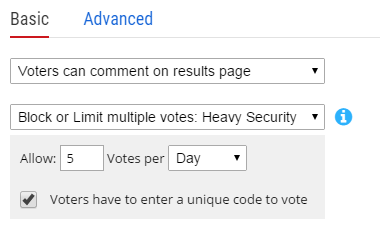
- Change the 'Security' drop down list from 'Allow multiple votes per person' to 'Block or Limit multiple votes: Light Security'
- A grey box will appear under the drop down list with more options
- Click the tick box 'Voters have to enter a unique code to vote'
- Select how many votes are allowed and for what time period
- Click 'Save Poll' to update your poll settings and then click on the 'Share' tab
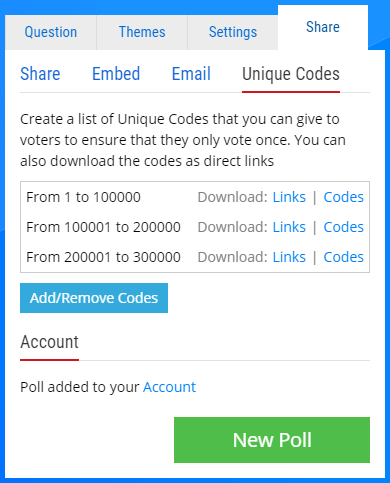
- Click on 'Unique Codes' from the 'Share' tab
- Click 'Add/Remove' Codes and enter the total amount of codes you will need. You can add more codes at any time
Please Note: If you add more codes by increasing the amount this will not change the original codes. If you set a lower amount then codes after that amount will become invalid. - Click the download links to the right to download your codes (or to download the codes as unique links). If you have more than 100,000 codes then the codes/links will be split up into multiple files of up to 100,000 codes each.
Once you have setup Unique Codes your poll will be secured via the codes and voters can reply multiple times from the same computer/location as long as they have a valid code (that hasn't already been used to vote more than you have allowed).
Using the Unique Codes
Your voters will need to enter a code you have given them to use your poll. Their vote will then be tracked alongside that code and you can see which vote belongs to which code by exporting your votes.
If you click 'Links' to download your codes as unique links then your voters can click the link to go to your poll and they will not have to enter a code.
Signing Up for an Account
Our accounts are 100% free and as per our Privacy Policy We will never sell, misuse or exploit any information provided to us.
Creating an account at any time will not reload the page so you can even do so in the middle of creating a Poll, or at the end and it will still attach the Poll to your account.
Creating your Account
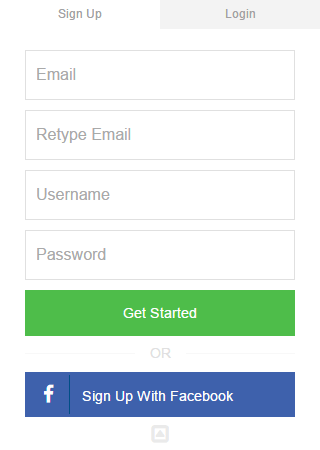
- You can create your account at any time by clicking the 'Menu' icon at the very top right of our website and selecting ' Sign up (free)' from the menu that will drop down. A new 'Sign Up' dialog will appear.
- If you want to signup via Facebook you can skip down to the last Blue button and just click on 'Sign up with Facebook'. You will be asked to login to Facebook and authorise our App to continue.
- Alternatively, Enter your Email Address in the top box
- Retype your email into the second box - this is to protect against Typo's and make sure it is the same both times.
- Type a User Name in the third box - it can be anything you like as long as it hasn't already been used and is 6 or more characters.
- Type your password in the last box - it needs to be more than 6 characters and it is recommended to use a combination of letters and numbers.
- Click the green 'Get Started' and you are done!
Already have an Account
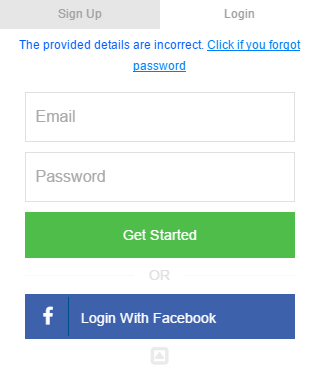
If you already have an account and need to login you can do so by clicking the 'Menu' icon at the very top right of our website and selecting ' Login', or by clicking 'Login' at the top of the Signup form.
When you login to our website it does not reload the page so you can do so in the middle of creating or answering a Poll, or at the end and it will still attach the Poll to your account.
Accessing your Account
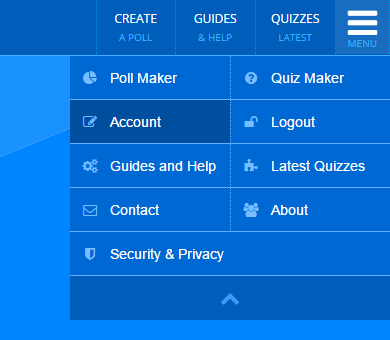
If you already have an Account you can access your Account Dashboard by clicking the 'Menu' icon at the very top right of our website and selecting ' Account' from the menu that will drop down.
You will need to Login or Sign Up for a free account before you can access your Account Dashboard - you will then get access to:
- Manage all your Polls and Quizzes
- Advanced Reporting
- Data Export to Excel / CSV / HTML
- Printable and PDF Reports
- Advanced Voters Management
- Poll Security
- And much more!
Forgot your Password
If you can't remember your password, you can use our Retreive Password form to request a password reset link to be sent to your email address.
Forgot your Account Email
If you can't remember what email address you used to sign up with but can remember your user name you can use the second part of the Retreive Password form to login and then check your email from the Account section of the Account Dashboard
Forgot Everything
Maybe you bumped your head? It might be wise to visit your nearest Hospital or Mystical Shaman. If that fails don't hesitate to Contact Us with as much detail as possible and we will try and track down your account for you.
Claiming a Poll or Quiz
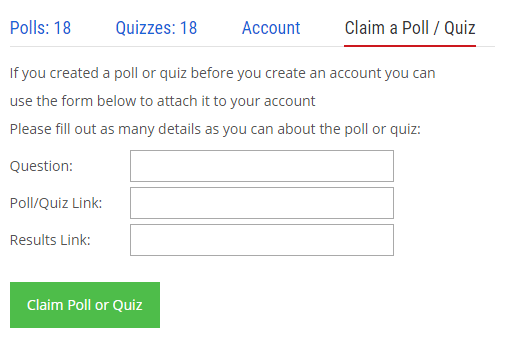
If you forgot to login or sign up for an account while creating your poll or quiz, it isn't too late! From the Account Dashboard click on 'Claim a Poll / Quiz' and enter as many details of your poll or quiz as possible into the form.
In most cases your Poll or Quiz will automatically be attached to your Account and if you reload the page you will see them under the Poll or Quiz section of the Account Dashboard.
Unable to Claim Poll/Quiz
If the Claim form doesn't work feel free to Contact Us with as many details of your Poll or Quiz that you can remember and we will try to track it down for you. If the email address you use to contact us is different to your account email address, please remember to send us your account email address too so that we can properly attach your poll or quiz to your account.
Login from the Share Tab
Disaster! You have finally finished making the best Poll the world has ever seen and then realize you never Created a Free Account or you forgot to Login! Never fear, it isn't too late! You can login or sign up directly from the Share tab and your Poll will automatically be added to your account.
At the bottom of the Share tab is an 'Account' heading, click 'Create a free Account' or 'Login'. If you are already logged in, it will say 'Poll added to your Account'.
Updating your Account Details
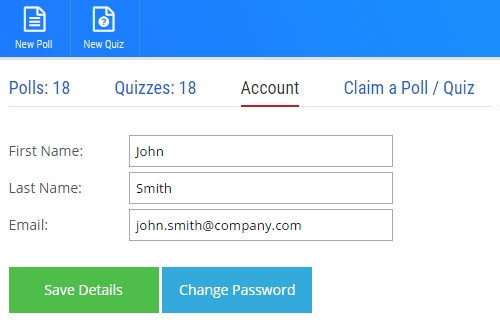
You can update your account details from the 'Account' tab of the Account Dashboard. Enter your new details and click 'Save Details' to apply.
Changing your Password
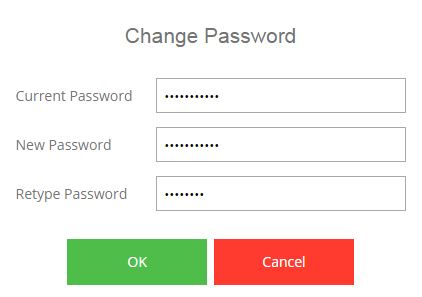
You can change your password from the Account Dashboard by clicking on Account and then clicking the blue 'Change Password' button. A new window will open and you need to enter your Current Password into the top box and then type your new password in the second box, and type it again exactly the same in the third box before clicking 'OK'. You will not need to log back in after changing your password.
Viewing your Active Polls
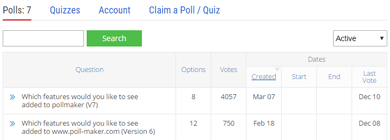
You can view your active polls from the Account Dashboard by clicking Polls up the top.
A list of your most recent Polls will appear in the list sorted by the most recently created. If you have a large amount of polls you can scroll down to the bottom of the page to load more of your active Polls.
Sorting the Active List
Click the column headers to sort by a different column (eg: Responses) and click again on that column to change the sort order from Descending to Ascending and back.
The up or down arrow in the top right of the column header indicates which columm the list is currently sorted by and if it is Ascending or Desending.
Managing your Polls
Clicking on a poll in the list will expand it to show a mini report of the votes and a variety of buttons that you can use to manage your poll, including Editing, Publishing, Stopping or Clearing the poll. You can also click the white refresh icon to the right of the poll question to update the poll details (such as number of votes and the mini report) without reloading the page.
Viewing your Stopped Polls
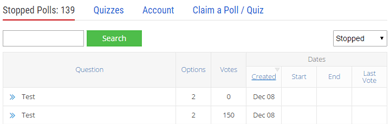
Click on Polls from the Account Dashboard and change the drop down at the top right of the list from 'Active' to 'Stopped'.
Your stopped polls will load and can be managed in the same way as your Active Polls.
Searching for a Poll
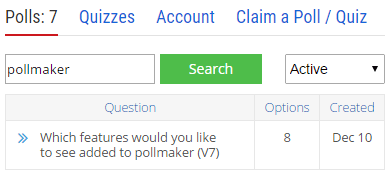
- Click on Polls from the Account Dashboard to see a list of your top Active or Stopped polls.
- Click inside the box at the top with the green 'Search' button next to it and type a word or words from the Title or Questions of your poll.
- Click the green 'Search' button and the list below will change to any polls containing those words - if the drop down list in the top right says 'Active' only Active Polls will show and likewise for Stopped.
- The polls can be managed in the same way as your Active Polls
- Clear the search box and click the 'Search' button again or reload the page to load the unfiltered list
Editing an existing Poll
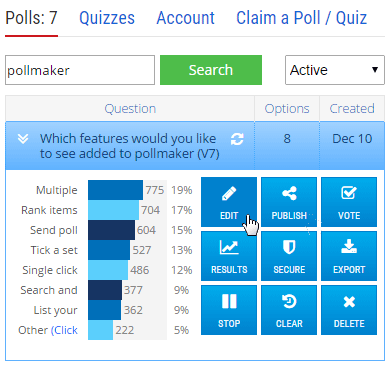
To edit an existing poll, click on the poll in your Polls List and then click the ' Edit' button. You will be taken to the Account Poll Editor page when you can update your poll and then click the orange 'Save Poll' button.
Will it effect existing results?
Editing an existing poll will never delete or effect existing poll votes, however if you remove an answer then that answer will no longer show up in reports or exports of previous votes.
You can safely edit the question or add new answers and edit the text, pictures or other details of existing answers without effecting previous votes.
Publishing an existing Poll
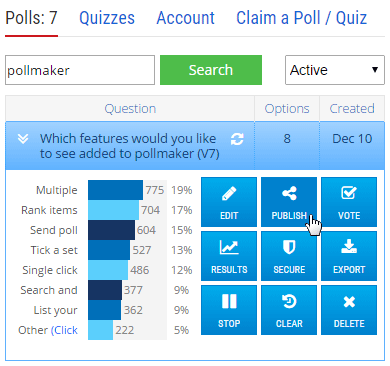
To access the share links, embed codes or social media sharing buttons for existing polls first click on the poll in your Polls List and then click the ' Publish' button. You will be taken to the Share tab of your poll on the Account Poll Editor page where you can find all the share, embed, email and unique code details.
Viewing your Results
To access the full reports for your poll first click on the poll in your Polls List and then click the ' Results' button. You will be taken to the Account Results page where you can:
- View your full poll results report
- View the Geographical Response Heat Map
- View the Response Time Line
- View your Poll Comments
- Print your reports to PDF / Paper
- Manage your poll results
Viewing individual Responses
To access and manage a full list of responses to your Poll first click on the poll in your Polls List and then click the ' Responses' button. You will be taken to the Manage Responses page where you can view or delete your responses.
A list of individial responses will load sorted by quantity of responses, you can sort the list in the same way as the Active Polls list. Scroll to the bottom of the list to load more responses.
Viewing a Response
Click on a response to view it and it will expand to show the answers to each question. At the bottom you can see the date of the response and the score (if applicable). Click the open icon to the right of the response answers to view the actual report that the respondent was given at the end of their poll (it will open in a new window).
Filtering your responses
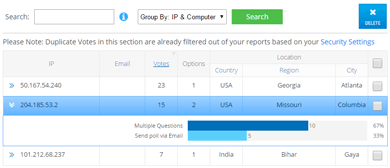
Use the 'Group By' drown down list at the top to change how responses are grouped then click the green 'Search' button. For example if you change it to 'Group By: IP & Computer' then the list below will show only one row per unique combination of Computer Fingerprint and IP Address.
If one row has multiple responses you can click on the response and use the left and right arrows in the blue bar underneath the answers to see the answers for each response in the group.
Please Note: The response list is not filtered by the Poll Security settings, however if you have security settings applied it will show in the list if a response is counted or not. For example it might say '2 / 4' in the responses column to show that only 2 of the 4 responses are counted in the results. Also, when you click on the response it will say in the blue bar underneath the answers if a response is 'Counted' or 'Not Counted'.
Search for a response
Use the box at the top labeled 'Search' to enter a word to search for and then click the green 'Search' button to perform the search, you can search for any answer to a text question or an IP Address, Location or Browser Tag.
If you have performed a search for the answer to a text question the 'Browser' column will change to show that question instead of the browser details.
Clear the box and click 'Search' again to return to the unfiltered list.
Deleting Responses
You can also Delete Votes from your poll via this page or the Secure Poll page.
Printing individual Responses to PDF / Paper
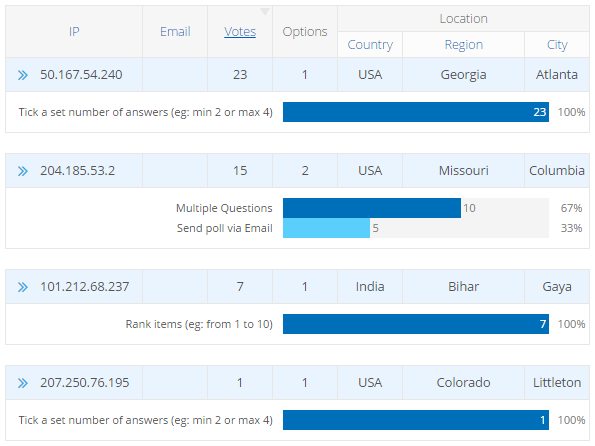
If you want to print every response to your Poll (or a subset of them) you can do so from the Manage Voters page.
- Access the Polls List and click on Voters for the poll you want.
- If you have a large amount of responses you will need to first keep scrolling down the page until they have all loaded onto the page (you will know you have reached the end when it stops loading more as you scroll).
- Find and click the 'Print' button on your Browser
- If you want to print to PDF and you are using the Chrome browser then simply change the 'Destination' to 'Save as PDF'. In other browsers you can download free Print to PDF extensions (eg: Cute PDF) - install one of those first.
- In the print preview you will see that all the responses have expanded to show all the votes for each response (or group of responses if you have grouped them with 'Group By').
Adding Votes to your Poll
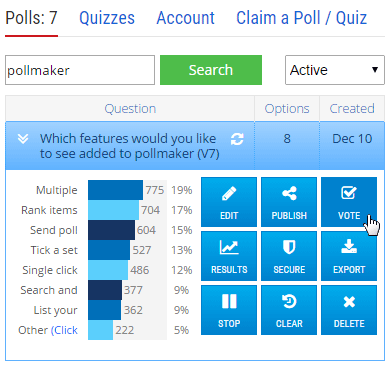
If you want an easy way to actually take your Poll, you can do that with the ' Vote' button from the Polls List. It will open your live poll in a new window.
Adding lots of Votes
If you need to add a large amounts of votes (or if your Security Settings are preventing you from adding as many votes as you need), you can do so from the Advanced section of the Settings tab by clicking 'Set Starting Votes'.
Securing your Poll
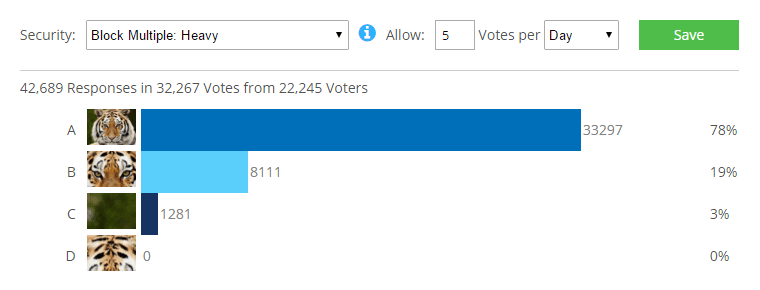
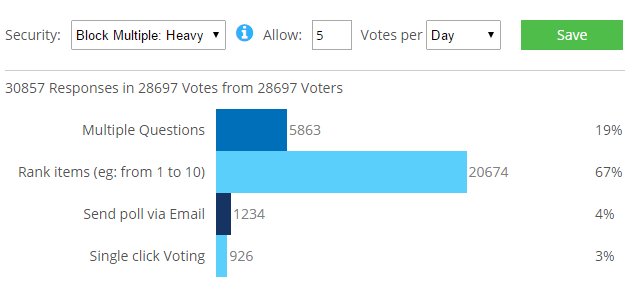
It is possible to change how your poll reacts to multiple votes from the same person after the poll is already live. Changing these settings never deletes votes and can be changed back at any time.
Change the 'Security' drop down and other options at the top and the vote report below will update live as you change the settings. When you are happy with the changes click 'Save' to make those changes live. The vote report will show what your report looks like with the votes filtered out from your report and data exports.
In addition you can Delete Votes or view the individual responses as per the Manage Voters section.
What each setting means
A more detailed explanation of the security options can be found under the Blocking people from voting section.
Exporting Results to Excel/CSV/HTML
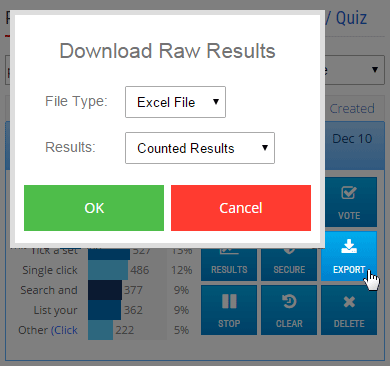
- First click on the poll in your Polls List and then click the ' Export' button.
-
Select the file type from the 'File Type' drop down list. A CSV File is a Comma Separated Variable file that can be imported into most applications.
Please Note:Some versions of Microsoft Excel will show a warning message when you first open the downloaded 'Excel' file. This is due to the way the file is formatted and can safely be ignored.
-
Change the 'Results' drop down to the type of results you require.
- All Results will download every response to your poll even if it has been filtered out of your reports by the Poll Security settings.
- Counted Results will download only those responses to your poll that have been allowed based on the Poll Security settings.
- Click 'OK' and your file will start downloading.
Stopping your Poll
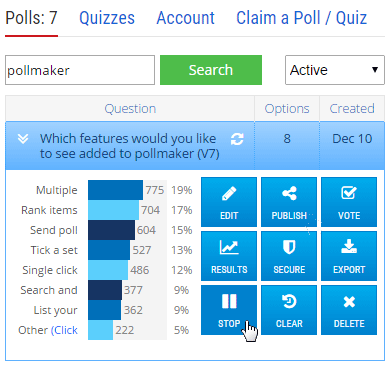
To immediately stop an active poll, first click on the poll in your Polls List and then click the ' Stop' button.
Stopped polls will appear in the Polls list and accessing them will show a message saying that the poll is no longer active. When a poll has been stopped it will no longer accept new votes.
Clearing your Poll Results
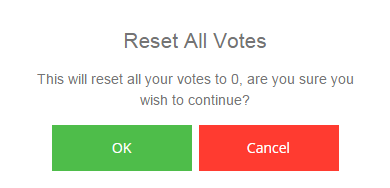
To reset your poll votes back to zero and remove any existing votes you can use the Clear button. First click on the poll in your Polls List and then click the ' Clear' button. You will be asked to confirm, so click 'OK' to remove all votes.
Deleting your Poll
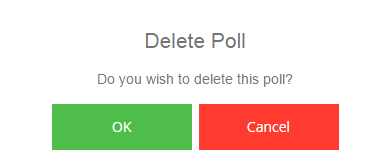
If you want to completely delete your poll altogether first click on the poll in your Polls List and then click the ' Delete' button.
If you have previously shared, linked to or embedded your poll it is recommended that you Stop your poll instead of deleting it.
How is it different to 'Stopping'
The link (or embedded poll) for a stopped poll will show that the poll has been stopped, however the link for a deleted poll will not work at all and an embedded poll that has been deleted will show an error message.
Deleting Individual Votes
You can delete individual votes to your poll from either the Manage Voters section or the Secure Poll sections.
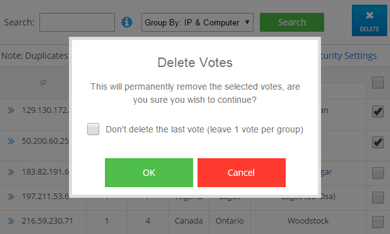
- Tick each voter (or group of voters) you wish to delete in the tick box to the right of the row.
- Tick as many as you want and then click the 'Delete' button at the top right of the page. A dialog will open asking you to confirm.
- If you have grouped your voters with the 'Group By' drop down you can tick 'Don't delete the last vote' in the confirm dialog and the latest vote from each group will not be deleted.
Printing reports to PDF / Paper
- Login to your account, select the poll you wish to report on from your Polls List and click the ' Results' Button
- Find and click the 'Print' button on your Browser
- If you want to print to PDF and you are using the Chrome browser then simply change the 'Destination' to 'Save as PDF'. In other browsers you can download free Print to PDF extensions (eg: Cute PDF) - install one of those first.
- In the print preview the page will automatically change to a print ready document - you may need to tick "Background Graphics" to see the report best
You can also print individual votes to your Poll, and Print the Poll itself.
Viewing the vote Pie Chart
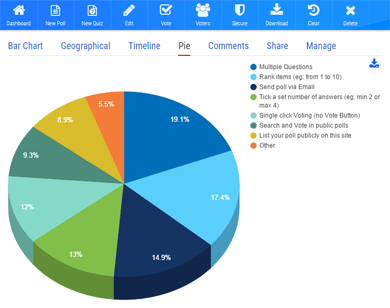
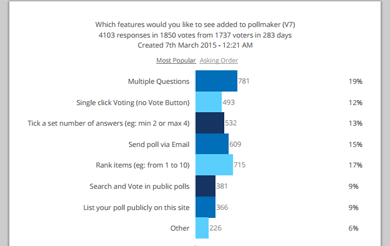
You can view the voting Pie chart from within your Account Results by clicking on the blue 'Pie' link at the top of your report.
The pie chart shows the total distribution of your votes as percentages of the total amount of votes. There is also a key in the top right that shows what each color in the pie represents. You can hover your mouse over each pie segment to see what it is and the percentage and vote number it represents.
By default the answers are sorted from most to least popular in your pie chart.
Download the Pie Chart
Click the blue download button in the top right of the Pie Chart to save it as an image to your local computer (for use in presentations etc...).
Viewing the voting Time Line
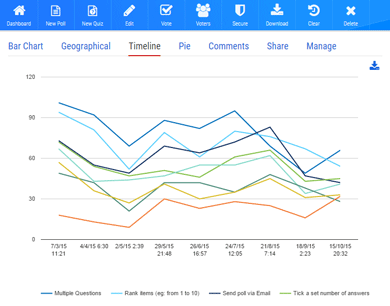
You can view the voting Time Line from within your Account Results by clicking on the blue 'Timeline' link at the top of your report.
This graph shows how the votes for your poll have been distributed over time - the time scale automatically adjusts based on how long the poll has been active and 1 point on the time (X) axis does not always represent 1 day or 1 hour.
There is a key at the bottom of your time line that shows which color in the graph represents which answer in your poll.
Download the Time Line
Click the blue download button in the top right of the Time Line to save it as an image to your local computer (for use in presentations etc...).
Viewing the response Map
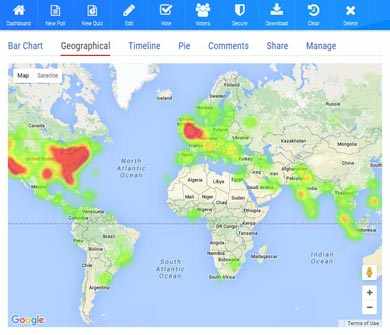
You can view the response Location Heat Map from within your Account Results by clicking on the blue 'Geographical' link at the top of your report.
This map shows the intensity of responses from each region of the world. Red indicates a large amount of responses, yellow indicates a moderate amount of responses and green indicates few responses. You can zoom in and out of the map with the vertical drag bar on the left of the map, and you can click and drag to move around the map.
Download the Map
Currently the only way to download a copy of the map is to use a Screen Capture.
Viewing your Comments
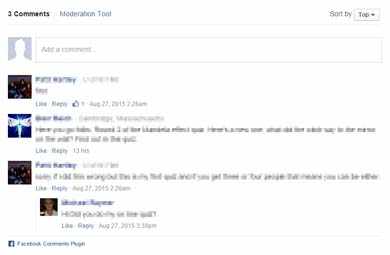
You can view your poll comments from within your Account Results by clicking on the blue 'Comments' link at the top of your report. This will show the Facebook Comments box and you can review the comments and/or add comments.
Moderating Comments
Unfortunately it is not possible to moderate the comments, however you can report inappropriate, offensive or spam comments to Facebook by hovering over the comment and selecting the down arrow that appears to the right of the comment.
Select 'Flag comment' or 'Report to Facebook' and follow the Facebook prompts (you will need to login to Facebook).
How do I know who has responded to my poll?
There are a number of different ways you can see who has responded to your poll. All are accessible via your Account Dashboard - First click on the poll you wish to see then:
Can I track my voters by email?
Yes it is possible to track your voters by email address, you can do this by one of three different ways.
Asking my voters to enter their email address
You can ask your voters to enter their email address before they vote from the 'Advanced' section of the Settings tab.
Sending via PollMakers Email System
You can use the PollMaker Email system for free to send out your emails and the tracking will automatically be done for you - you can also use the same system to send out reminder and thankyou emails to your voters.
You can also use this in combination with the previous option and it will automatically track emails you send and ask everyone else you give the link to (outside the emails you send) to enter their email address before voting.
Sending via my own Email Software
If you embed your poll into your own email using the Email Compatible code and wish to track the email addresses of your voters you will need to have email software that allows you to dynamically embed the email address of your recipients as you send the email, or you will need to manually edit the embed code for every email that you send out and only send out 1 email at a time.
To add the email tracking code you will need to edit the Email Compatible embed code you are given to include a special tracking code. Firstly paste your code into your email (or into Notepad) and then look through for every vote URL. They will look something like this: http://www.poll-maker.com/poll258677xb49B4b97-10#A1 and there will be a slightly different link for each answer in your poll.
Add the code ?t=email@example.com before the # hash character and replace the email@example.com with the recipients email address or with the code from your email system that will add the recipients email address when you click send. It will end up looking something like this: http://www.poll-maker.com/poll258677xb49B4b97-10?t=email@example.com#A1. You will need to do this to every URL in the embed code (there will be one for each answer and they all will end in a different number).
Can I have multiple questions in my poll?
Yes you can by building your poll in our Quiz Maker instead of the Poll Maker. The Quiz Maker has a few features that are not available in the Poll Maker, such as multiple questions, scoring, outcomes, logic and live presentations.
You can actually Make a poll in the Quiz Maker to access these features and it is still 100% free and unlimited.
Are there any limits to voting?
There are no limits to voting. Your polls can receive an unlimited amount of votes, and our systems process millions of votes per day. Results are always real-time
Voting by automated scripts or robots is considered abuse of our systems and will be blocked and all automated votes removed - this is not for performance reasons, but because it is not in the poll creators interest to allow automated voting.

Show / Hide the Comments Section
If you want your voters to be able to comment on your poll you can add a Facebook Comment Section into your poll results by making the top drop down in the 'Basic' section of the Settings tab say 'Voters can comment via facebook on results page'. You can turn the comments off by changing it to say 'Disable commenting on results page'. Your voters will need to log in to Facebook to comment (if they aren't already).